TECH TIPS
The Splinter Preventer
To help prevent the edge of the sweep board from becoming splintered
This tip comes from KMK member Mark Miller.
To help prevent the edge of the sweep board from becoming splintered, use a round-over bit and a router to take the sharp edges off the board.

The Missing Link
If you find a Rake Hook Control Link with elongated holes and you do not have a spare, here is a clever way to get your machine running.
This tip comes from KMK Member Amano Ho.
If you find a Rake Hook Control Link with elongated holes and you do not have a spare, here is a clever way to get your machine running.
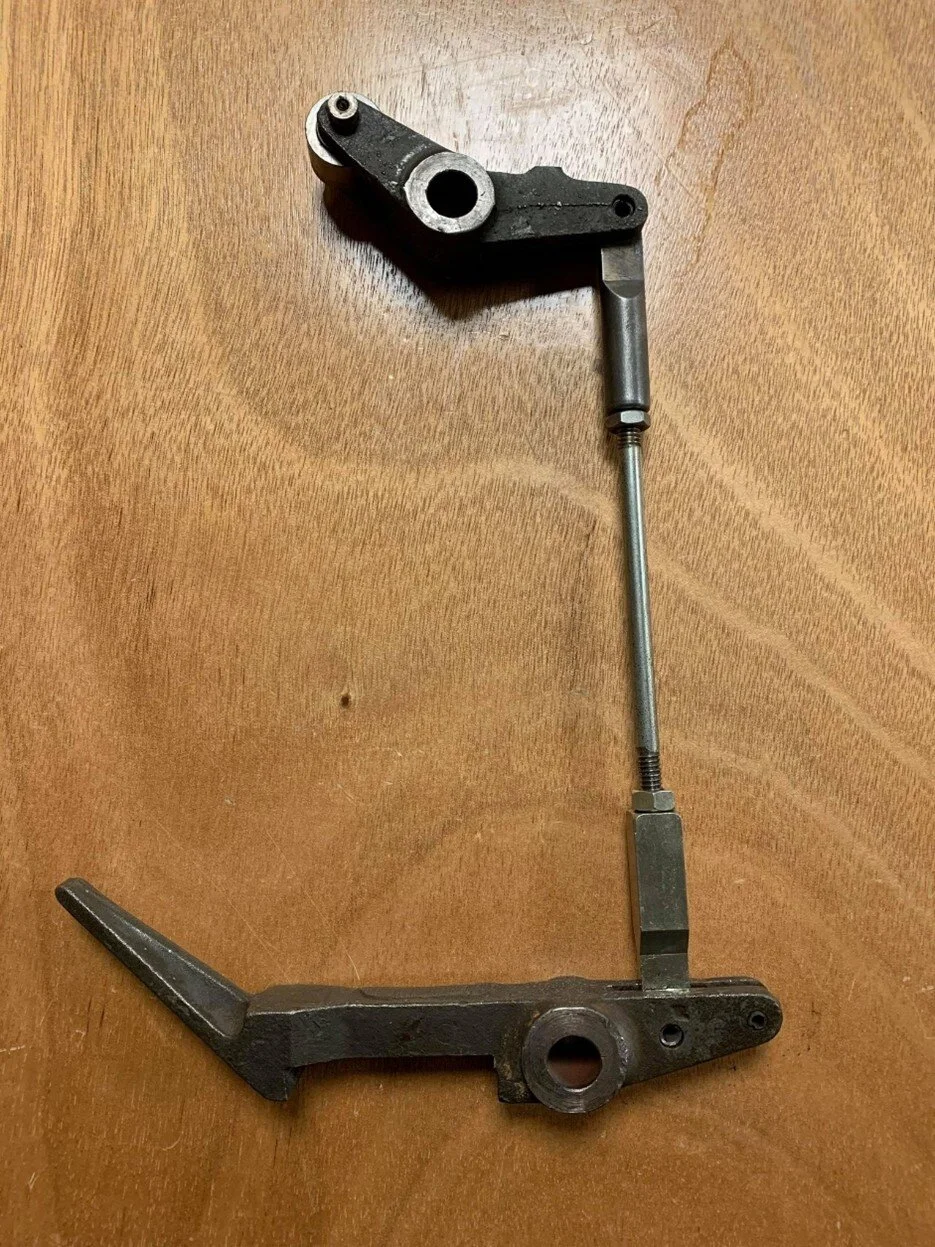
Use a shortened version of the Rake Hook control rod. This will also allow you to make a temporary adjustment in the event of a Rake Hook cam follower failure.
How to Rock your Roller Replacement
Replacing a deck roller is not difficult if you keep a few of the roller and bracket assemblies built ahead of time.
Replacing a deck roller is not difficult if you keep a few of the roller and bracket assemblies built ahead of time.

Use care to not lose the counter-sunk, mounting bolts. They are threaded at ¼-28 and are the correct length to mount the bracket without protruding far enough to touch the roller.

The Slam Dancing Turret
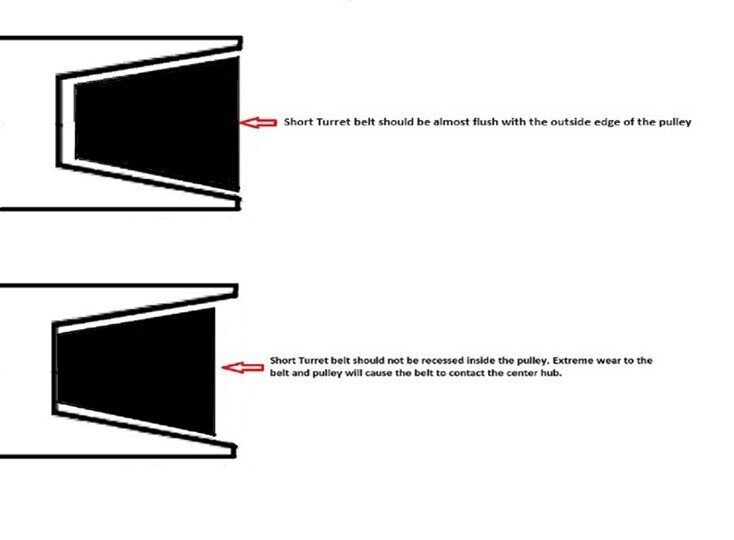
If the turret is observed indexing with a hard stop and start motion, check the condition of the short turret belt and the turret drive pulley.
Hard Indexing of the Turret
If the turret is observed indexing with a hard stop and start motion, check the condition of the short turret belt and the turret drive pulley.
After a pin has been delivered to the turret, and it has indexed to the next position, turn the machine off. Depress the indexing lever, if it is difficult to depress, the short turret belt and/or the pulley are worn.
Lights, Camera, Action!
One of the most valuable tools an AMF equipped bowling center can have is a camera system and a DVR.
Here is a tip From Mark Davis at the Kegel Training Center.
One of the most valuable tools an AMF equipped bowling center can have is a camera system and a DVR. At the Kegel Training Center, every pair of lanes has a camera mounted above it.

Using the DVR, you can monitor your machines from a distance and replay any problems that arise.
This also allows you to use diagnostic marks on your machines to help troubleshoot problems that might be too fast for the naked eye.
Below is a future pin jam with a headfirst pin orientation, one pin pocket before the pinwheel marking!


Don’t Be on Pins and Needles
When changing Molex pins, be certain that the wire and insulation are crimped onto the correct part of the replacement pin.
When changing Molex pins, be certain that the wire and insulation are crimped onto the correct part of the replacement pin.

Wrenches for Scissor Work
Here is a tip from KMK member Matt Murphy: By grinding the boxed end of a 15/16” wrench flush so the points are not at all recessed
Here is a tip from KMK member Matt Murphy:
By grinding the boxed end of a 15/16” wrench flush so the points are not at all recessed, it reduces the chance of rounding off the skinny hex on the scissor stud and makes it easier to get a hold of that slim hex. It's also nice to have a 9/16" modified in the same way for 12-200028 "Shoulder Pin" that goes through the scissor drag link.

Jogging My Memory
If you have the older style flat Jogger Links found on Model A and some other pinsetters, here is a tip about the Jogger Link bearings.
If you have the older style flat Jogger Links found on Model A and some other pinsetters, here is a tip about the Jogger Link bearings.
Sometimes the large bearing will become loose in the Jogger Link. If this happens, you can save the link by welding a steel spacer to the link and then cutting through the spacer and link. Insert a bolt with a washer, add a washer and Nylock nut and you now will be able to clamp the bearing in place.

Ball Wheel Belt Replacement Instructions
| PART REMOVAL | BALL WHEEL BELT |
| ESTIMATED TIME | 45-60 MINUTES |
| REV DATE | 12-09-2020 |
| DIFFICULTY | BASIC-AVERAGE PINSETTER KNOWLEDGE |
TOOLS NEEDED:
3/8” drive ratchet
3/8” extension preferably 10” or longer
3/4" socket
3/4" wrench
11/16” wrench
9/16” socket
9/16” wrench
1/2" wrench
At first, changing a Ball Wheel belt will seem like a nearly impossible task. With a little practice and some hints and tips it can be done in 45 minutes or less. There are several possible procedures for this belt change, the following is one of them.
Follow the manufacturers safety recommendation for your machines.
1. Remove the power from the machine and for extra safety, disable the machines on each side.
2. Remove the rear Elevator Guard.

3. Remove the spring tension from the Ball Wheel belt idler pulley.

4. At this point you have a decision to make, you can cut the old belt or remove it in 1 piece. I like to remove the old belt intact if possible. This way if there was a manufacturing or labeling error with the new belt, I still have a belt. (It might not be great, but still better than having no belt)
5. If you cut the belt (or it is broken), remove it from the machine, if you wish to remove the old belt in one piece proceed to step 6.
6. Using a 3/4" socket on an extension with a ratchet, remove the Left-hand Ball Wheel guard.

7. Remove the Motor to Gearbox and Motor to Elevator belts.
8. Remove the Cross Conveyor drive belt.
9. Remove the Long Turret drive belt tension spring and the Long Turret belt.
10. Remove the Ball Wheel belt tension idler pulley and shaft by removing the 2 bolts that protrude through the elevator frame and each end of the shaft with a 9/16” wrench.
11. With a 9/16” socket and ratchet and a 9/16” wrench remove the 2 bolts and nuts that attach the top work platform to the elevator frame.

12. This is a good time to hook the new belt onto the top of the elevator frame and remove all twists.

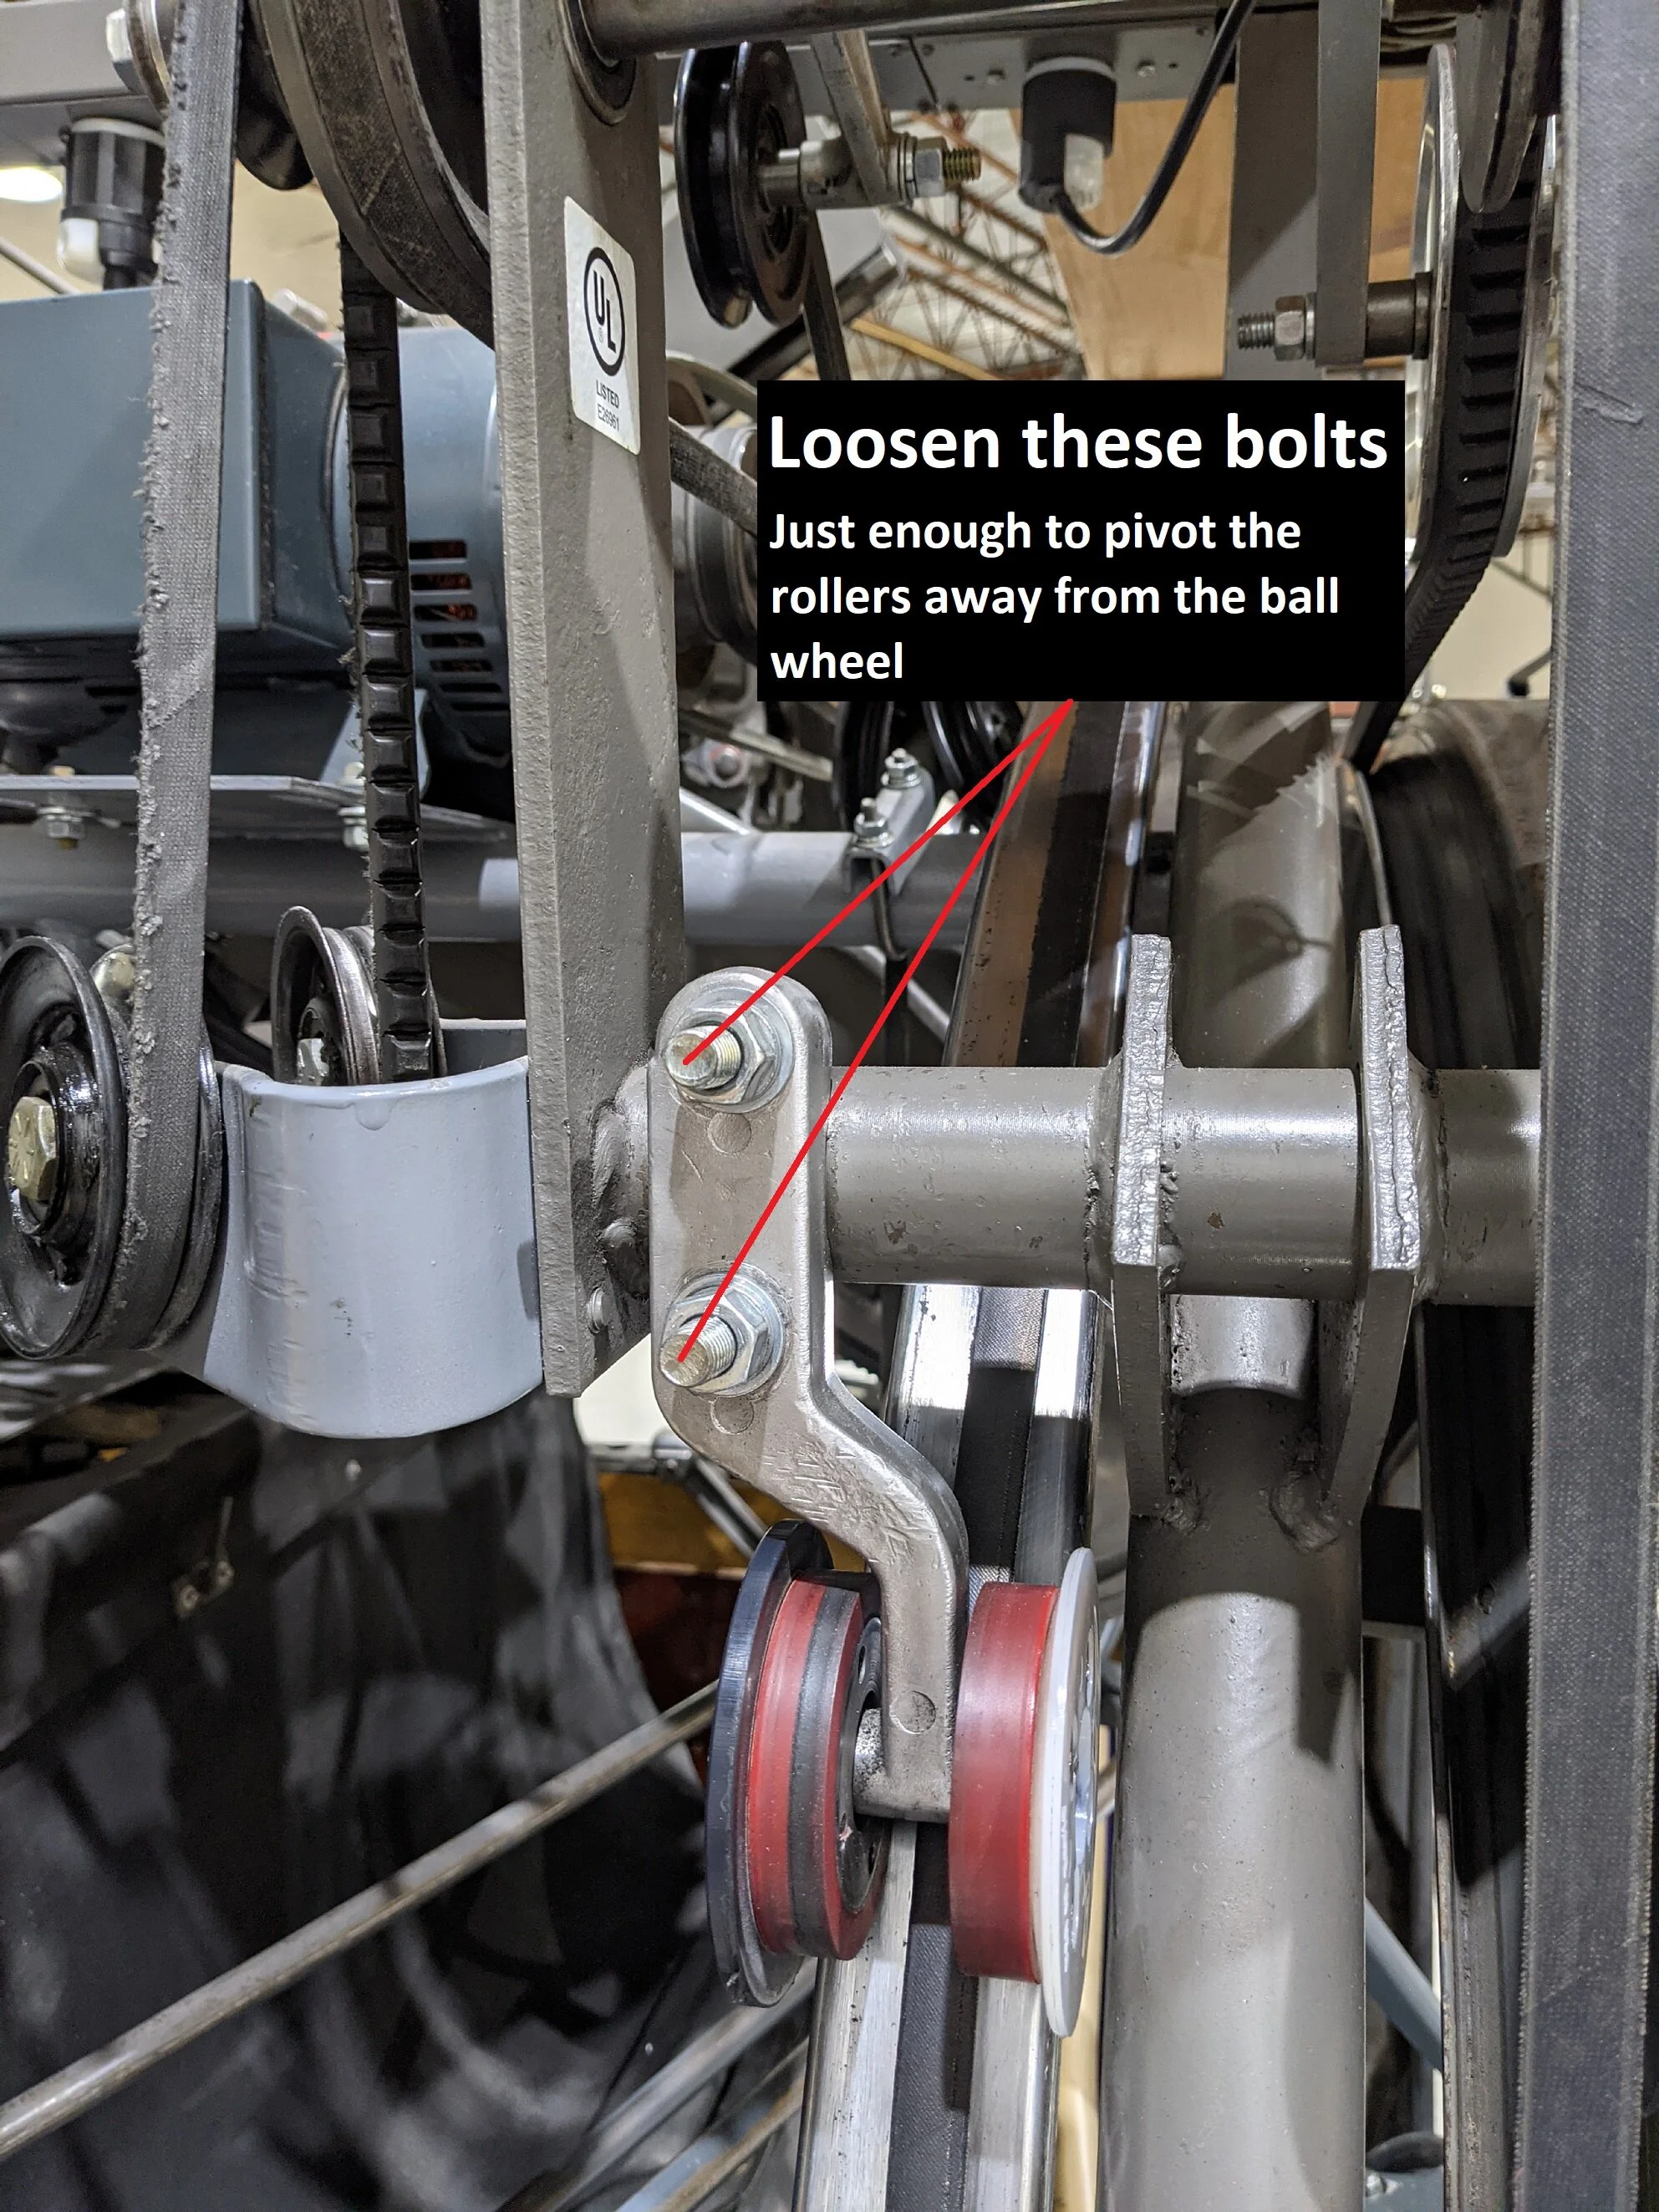
13. Loosen both sets of upper Ball Wheel guide rollers and rotate them slightly away from the Ball Wheel. This will allow you to lift the Ball Wheel enough to remove the belt from the lower ball wheel guide roller on the 10-pin side of the machine.
14. Unplug the pinsetter motor and loosen the bolt that mounts the motor mounting shaft to the center frame.


(Do not remove this bolt before checking to be certain that the other end of the motor mount shaft is fastened to the elevator frame.) Loop the Ball Wheel belt around the motor and remove the mounting bolt on the center frame. (Motor mounting shaft might drop a little.) Push the Ball Wheel belt between the mounting point on the main frame and the Motor mounting shaft.
15. Remove the Ball Wheel belt from the Pit Conveyor Idler pulley.

16. Lift the Ball Wheel belt so it can be removed from the Elevator frame. Push inward on the leg of the top work platform bracket and pull upward on the belt.

17. Remove the bolts holding the ball return track and track support brace to the track support. Feed the Ball wheel belt around the support brace and under the ball track.

18. Remove the Turn Pan spring. (Hint, you can use the spring from the Elevator Cross drive belt idler as a spring removal tool)

Pull downward to remove the Turn Pan spring.
19. Remove the nuts, lock-washers and flat-washers from the J-bolts that secure the Cross-Conveyor to the Elevator frame. (The Cross-Conveyor will drop slightly. Place your foot on the Ball Lift rods and support the Cross-Conveyor with your knee)


Pass the old belt under the turn pan and over the cross-conveyor frame. You should now be able to remove the old Ball Wheel belt from the machine.
The new belt will be installed following these instructions in reverse. Make certain to readjust all parts properly and check for proper alignment of the hardware. When the new belt is installed, double check the routing and tracking.
CLICK HERE to view a belt replacement video from our friend William Pike.
Switch Button
Removing the switch button from the pin holder housing can be a test of your patience.
Removing the switch button from the pin holder housing can be a test of your patience. Using a paper clip or the spring from the switch actuator can help but still takes some practice.
Try this tip:
Drill a 1/16” hole in the pin holder as shown in the photos. This will give you easy access to the retaining clip in the future.


Carefully remove the point from a push pin, this will now be a handy tool for removal of the switch button.

Keeping Tabs on the Tab
With time, the retaining tab for the pin holder solenoid will become weak or break off.
With time, the retaining tab for the pin holder solenoid will become weak or break off. Here is a quick fix to save the day if it happens to you!


Thread the zip tie through the holes to secure the solenoid in place.

Always Have a Spare
Installing a new Elevator drive poly cord can be a time-consuming project. Install a new Elevator drive poly cord
Installing a new Elevator drive poly cord can be a time-consuming project. Install a new Elevator drive poly cord around the shaft ahead of time to speed up replacement. Zip tie it to the frame to keep it away from the moving parts.

Get Your Bearings
When removing more than one rear roller from the GSX machines, take note that there are right and left configurations of the roller.
When removing more than one rear roller from the GSX machines, take note that there are right and left configurations of the roller. (Remember that right and left are determined from the bowler point of view)
The bearing block is the deciding factor as to which is left, and which is right.
The bearing blocks have a slot in them. This slot seats onto the frame on the ball door side.

The bearing block on the side of the roller with the drive pulley, should have the slot facing upward as shown.

The Accelerator Mediator
When removing the ball accelerator, place a 6-pound ball through the ball door.
When removing the ball accelerator, place a 6-pound ball through the ball door. It will act as a support during removal and installation.

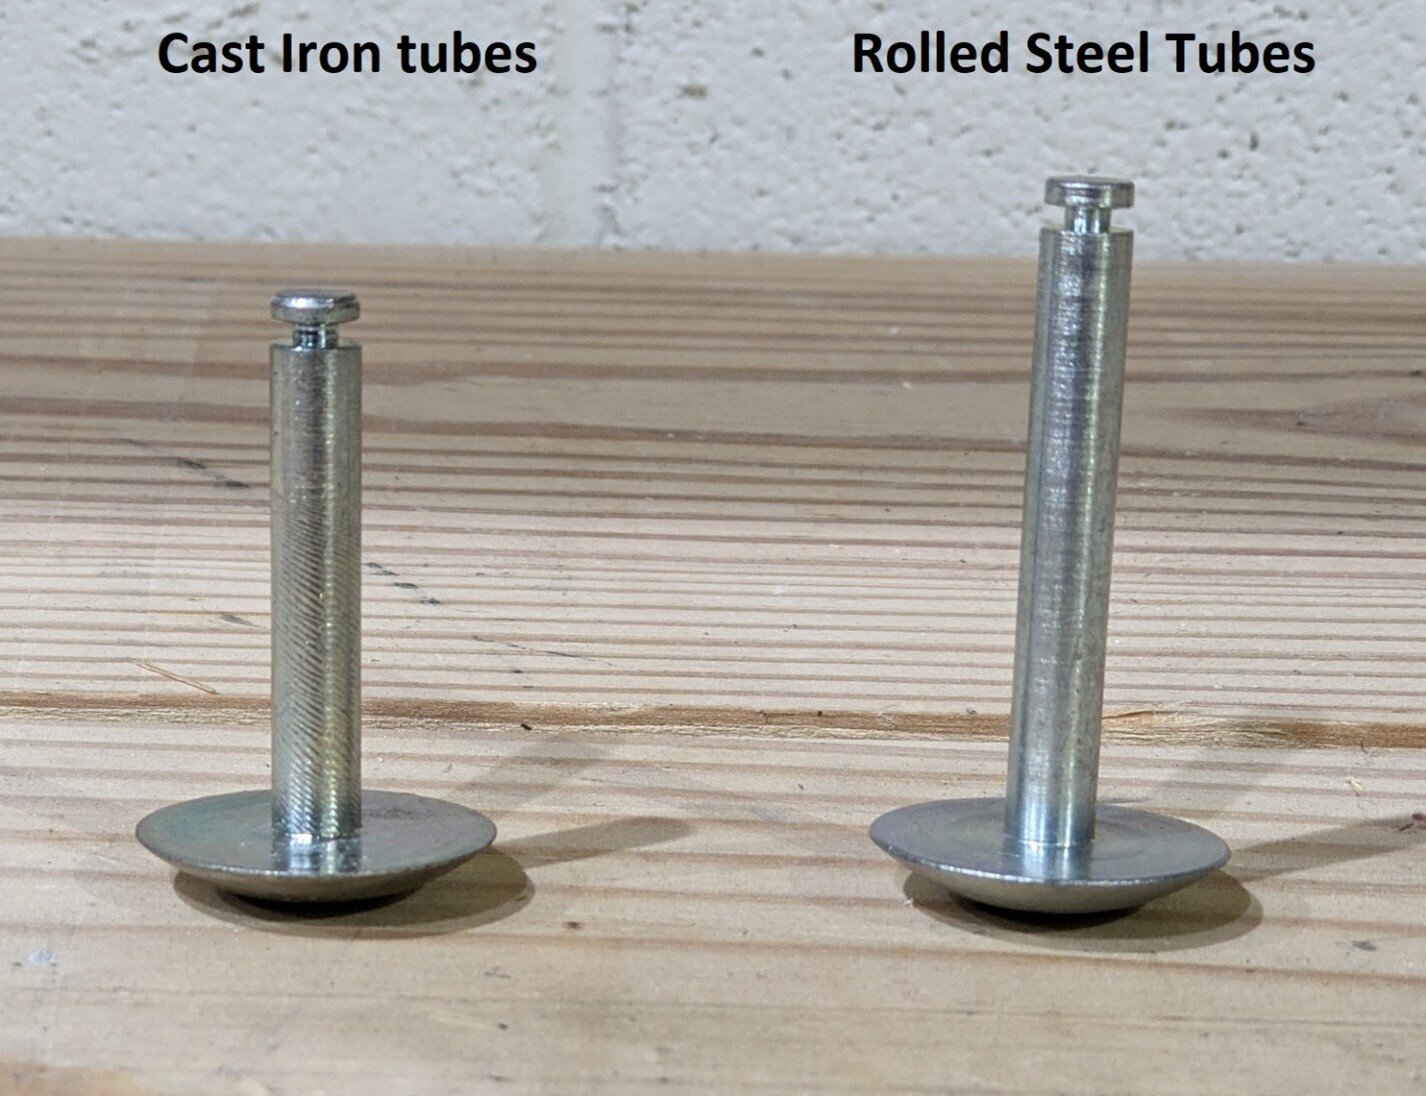
Deck Jam Tube Actuator Pins
There are 2 styles of actuator pins for the Deck Jam Tube.
There are 2 styles of actuator pins for the Deck Jam Tube. The shorter version is for cast iron tubes and the longer version is for the rolled tubes.
Getting Your Order Right
When reinstalling the turret clutch, the bolt, pulley, and bearings must be correctly oriented.
When reinstalling the turret clutch, the bolt, pulley, and bearings must be correctly oriented. The raised area inside the pulley goes against the bearing. The bottom bearing has the retaining ring. The spacer must be between the bearings.

Don’t Run With Scissors!
Do you have a pinsetter that sometimes does not pick up the pins? Do the scissors seem to only close part of the way?
Do you have a pinsetter that sometimes does not pick up the pins? Do the scissors seem to only close part of the way? Does this problem come and go?
If you answered “Yes” to these questions, you probably have a scissor link that has come loose from the rivet. You will need to inspect all 10 scissors because 1 scissor binding will stop all the others!

Shovel Cam Tip
When adjusting the Shovel Cam in a low light area, mark the center point of the cam with white paint or a white wax pencil.
When adjusting the Shovel Cam in a low light area, mark the center point of the cam with white paint or a white wax pencil.
Getting Your Bearings
One of the most over-looked lubrication points on the GS machine are the 2 plastic bearings on the distributor shafts.
One of the most over-looked lubrication points on the GS machine are the 2 plastic bearings on the distributor shafts. The front and rear shafts each have one.
The bearing on the front shaft is easily lubricated by removing the 3 bolts that mount it and sliding it over slightly on the shaft and placing a couple of drops of oil on the shaft.

The bearing on the rear shaft is harder to access. You can remove the Distributor shoe to give more room to reach the bolts and slide the bearing on the shaft. Some mechanics will leave the bearing bolted onto the frame, then drill a small hole through the housing and plastic bearing. Then place oil into the hole.

Sagging Shovels
To increase shovel loading efficiency, check to see if there is excessive play between the shovel square shaft and the shovel pivot lever.
To increase shovel loading efficiency, check to see if there is excessive play between the shovel square shaft and the shovel pivot lever.

To resecure the pivot lever onto the shaft, remove the shovel from the elevator. Place the shovel in a vice as shown and drill a 1/8 hole through the shovel and square shaft. Install a 1/8” x 1” split pin into the hole. This will make the lever solid again.

Also check the small and large track wheels for wear. If one or all these areas have wear, the front edge of the shovel will hang low and not allow a pin to roll rearward into the shovel easily.
Replace the large and small track wheels if needed.